|
Embedded YouTube video not working on iPad problem |
How to use GIMP: Simple get-you-started guide for beginners.
Here is a simple tutorial to help you get started using the GIMP image editing software.
You need to initially download the GIMP software from https://www.gimp.org/downloads/
1. Loading an image File and Saving / Exporting.
Start the GIMP program. Wait till the screen is filled with a largely dark grey rectangle, with scales along the top and down the left side. Across the top note the clickable links: File, Edit, Select etc.
1.1 Loading an image file
To load an image file from your PC folder:
File, Open, Documents or Pictures, and choose an image, typically type .jpg or .png
Choose an image that does not matter too much if you accidentally delete it or modify it and then overwrite it.
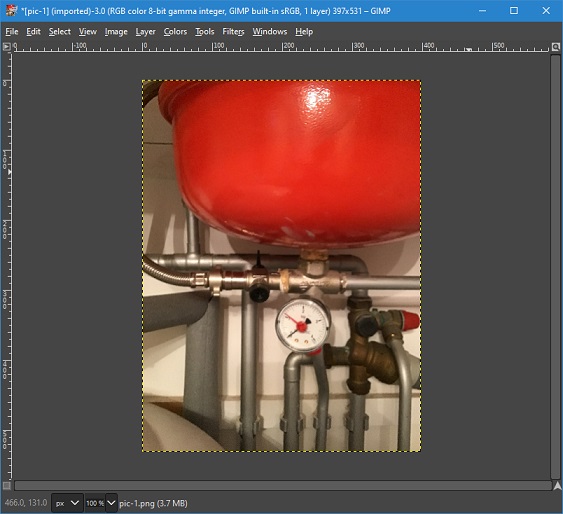
You should now see the image displayed as a rectangle in the middle of the screen, like this:
1.2 Saving / Exporting an image
You now have the opportunity to modify the image in some way, but for the moment, we will simply Save or Export the image.
Option 1: Click File, Save
If you follow this it will save the image using file type .xcf
.xcf file type means: " eXperimental Computing Facility". The saved file type is peculiar to GIMP and the file contains additional information. It is helpful to have this if you intend to re-edit the image file later.
Option 2: Click File, Save As
If you follow this it will give you the opportunity to change the file name and will then save the image using file type .xcf
Option 3: Click File, Export As
This is important, as most times you will want the output file suitable for the internet etc. You choose the file type, for example .jpg, .png] etc. Once you click Export there will be a delay until a smaller screen pops up with the Export options.
You have the opportunity to set the quality. 50% helps reduce the file size in bytes which is very important for web server and visitor speed of download. 90% or 100% is highest quality if further processing is anticipated or high quality printed output intended.
Google likes web pages if they download for people with mobiles and SLOW 4G connection in under 2.5 seconds. Keep the total size of all images on a page to under 100k bytes. Use ExportAs and setting the jpg compression about 20%. Often 20 kbytes per image is acceptable. Make images no larger than, say, 700 pixels wide, smaller if possible.
You can test the download time in a simulated SLOW 4G connection. Use Chrome browser and load the page. Click the three dots at top right, then More Tools, then Developer Tools. Highlight the Network tab and the re-download the page using the refresh circle with arrow at the top. Note the times taken for the intial html page and for each image. The blue line and DomContentLoaded time is what matters. Must be under 2.5 seconds. Set the screen dimensions width to a typical mobile size.
If you have media adaptive web pages that use "css media display:none;" for unwanted images on narrow mobile devices, then note that the unwanted images will still load and harm your download time. You can get round this in the body, like so:
Before:
<img src="https://www.example.com/imageforwidescreen.jpg" alt="Advert at side on
wide screen" width="100" height="100" loading="lazy">
After:
<picture>
<source srcset="data:image/gif;base64,R0lGODlhAQABAAD/ACwAAAAAAQABAAACADs="
media="(max-width: 700px)">
<img src="https://www.example.com/imageforwidescreen.jpg"
alt="Advert at side on wide screen" width="100" height="100" loading="lazy">
</picture>
2. Modifying or editing an image with GIMP.
2.1 Image scaling. Changing the pixel dimensions
Once you have loaded an image you may make it larger or small smaller and the save the result.
With the image in the middle of the screen, do Image, Scale Image. You will see a pop up window something like this:

Note the pixel Width and edit this number to something different. Then click px.
The intended width will now be as you input. The intended Height will have changed as well to keep the image proportions unchanged. This automatic change is because the ratio lock in ON. Note the small complete rectangular chain link between the width/height boxes and the px box. If you click on the rectangular link you can 'break' the link and this will allow you to change the proportions. Try these two options. Then click Scale to implement the scaling of the image.
Set the image pixel dimensions with consideration to likely screen size of the viewer's device. Smaller pixel size images are also faster to download.
2.2 Image Perspective adjustment.
Let us say you have a camera image of a rectangular object, such as a book cover, but the positions of the book and camera have no been carefully set up so that the camera was on the normal to the centre of the flat book cover. This example below illustrates the problem:
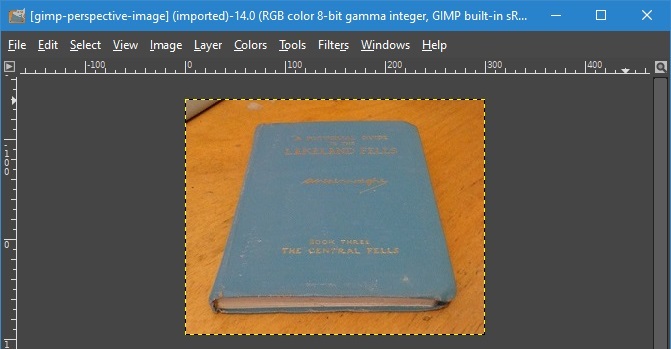
Note that the sides of the book slope inwards towards the top. The objective is to straighten tem up.
Do Tools, Transform Tools, Perspective.
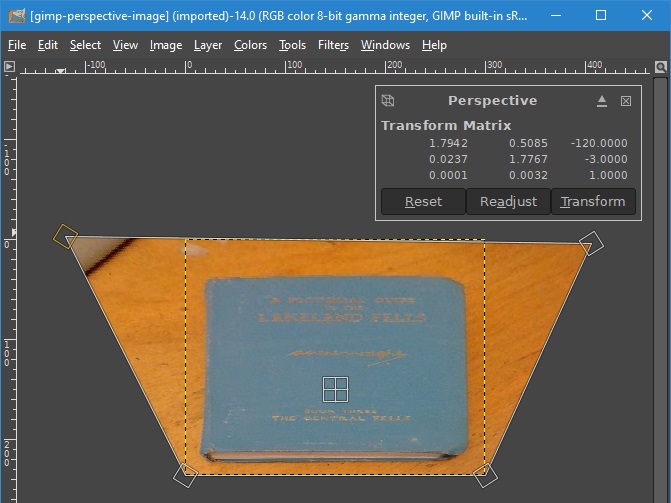
Note the yellow diamonds appearing at the corners. Click on each of the top corners and drag them apart until the sides pg the book cover are parallel with the black/orange rectangular outline. Click Transform to implement the image transformation.
Having done this you will need to do "Image, Scale Image" and alter the Height only until the book looks as it should, i.e. rectangular.
|
Any queries of contributions please e-mail me Eric Johnston This page is copyright (c) 2024 Satellite Signals Ltd, All rights reserved Page started 21 Feb 2024, amended 21 Feb 2024, 2 May 2026. |