How to fix a dripping tap.
This page shows how I repaired a dripping tap at the sink.
Dripping tap symptom:
The problem was that over time it became more and more difficult to turn off the tap. Eventually it still dripped even if done up very tightly.
Fixing the problem: The Cure:
I turned off the water supply to the tap using the in-line stop valve just below the sink. You need to simply turn the screw, using a medium size flat screwdriver, so that the screwdriver slot is sideways rather than in-line. Then turn the tap ON to make sure the water supply it is really stopped.
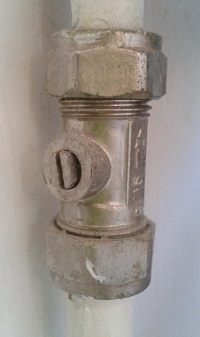
In-line stop valve underneath sink on pipe to the tap, shown turned ON.
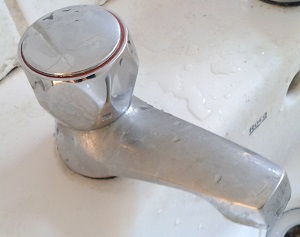
Tap at sink.
Now take the tap apart. First prize off the circular shiny top using a fine small flat screwdriver. Remove the top and the coloured (red/blue) temperature indicator.
The tap handle may now be lifted or prised off. It is plastic and if it breaks you will need to buy new. Note how the tap handle fits onto a short splined brass cylinder/rod. The number of splines may vary, e.g 18 or 20. Check for compatibility if you buy new parts separately.
With the tap mechanism exposed apply a 17mm ring spanner and undo the mechanism by turning the mechanism anticlockwise (while looking down). To avoid cracking the sink or causing damage underneath only apply force to the spanner relative to the tap spout. Setting the initial ring spanner position approx 30 deg to the left of the spout and squeezing the spanner arm and spout together worked fine for me.
Once you get the mechanism out it will look something like this below:
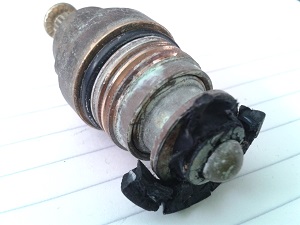
Very degraded rubber washer on tap mechanism.
In this case the rubber washer has virtually disintegrated, particularly around the periphery. A less degraded washer may look more like new with perhaps minor and tiny dents where one or more fine stones have damaged the surface. If the surface of the rubber is not smooth it will not seal properly. Note that in some cases the metal ring lower down inside the tap is corroded and irregular. This may be made smooth using a special grinding tool or, preferably, the entire tap replaced.
Removing and replacing the rubber washer can be difficult if the central pin is domed as shown. The old rubber washer may be carefully prised off. The new washer may need high pressure force to get it over the domed pin. Some mechanisms have a nut or screw instead of a domed pin, which makes replacement easier.
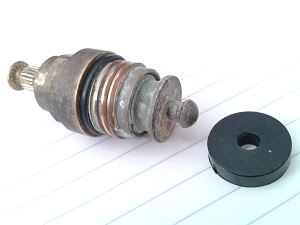
Tap mechanism with the old rubber washer removed and the new 1/2 inch washer ready to fit on the domed pin, with difficulty!.
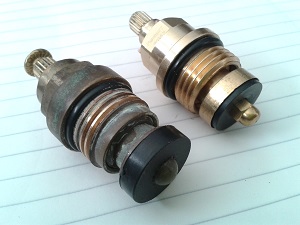
New tap washer applied (left) and the alternative of buying a new mechanism (right, with removable nut on the pin)
Now put it all back together, taking care not to over-tighten with the big spanner.
Lessons learned:
Replace all tap washers in the house every 5 years or at first sign of excess tightening being required to stop dripping.
Use the same type of taps throughout the house as far as possible. Bath taps may use a wider main thread screw, in which case adaptors are available.
Note number of splines on the top of the mechanisms; you will need a magnifying glass to count them.
|
I have updated this page so it hopefully works with small screen devices such a mobile phones and tablet devices. If you wish, you may comment on this page by emailing me at eric@satsig.net. Page started 4 Jan 2022, amended 30 March 2022. |